Wednesday, November 27, 2013

The Bright Wizard...


Painted in two nights - which is a record (by a long shot) for me. I stuck to a very simple pallet which helped but it was a very fun miniature to paint.

It is a Darksword miniature. I made a large batch purchase of their minis at one point and I'll say, the sculpts are outstanding - but I will never buy a miniature from them again for two reasons; A) the metal/pewter is so soft that these miniatures are almost unusable for any gaming, though nice show pieces perhaps; and B) the 'base' is part of the sculpt yuck! ...the models are already large (heroic) for most game systems but they have these huge bases as part of the miniature. It took a lot of filing/cutting to remove the pewter base and get the model on a comparable base to the rest of my models.

Anyway here are some more pictures. Considering I did so little work on this model I am pretty pleased with how he came out:


Tuesday, November 26, 2013

Primed and Ready - Some Good Guys!

Not a ton of progress but I've got a handful of good guys primed and did base-coating work on the Bright Wizard. I decided I can't have a proper Advanced Heroquest blog without painting up at least a few of the original miniatures. The Knight and Dwarf are from the original box and the Elf is from the Advanced Heroquest Paint-set - one of the Wizards is from either Warhammer Quest or Talisman (I don't remember which) and the other is a Darksword miniature.

Here is just the Bright Wizard with some basic base-coating:

And here is the Wizard again with the "80's Rainbow Bright" filter, that I discovered totally by accident - but will use to help learn where his highlights will go.

Monday, November 25, 2013

How to - Dungeon Tiles: Part 2 (Creating Basic Tile)

Let me just start out by saying, if you are feeling lazy and would rather buy some nice tiles, be sure to check out DriveThruRPG. Otherwise, if you don't already have your own technique you might find this helpful - carry on...

1) Ok this step is the easiest (funnest!) and will give you a simple, usable tile without any additional steps. The folks at Pyromancers have created an amazing tool (see The Tools below), it's practically cheating. Using the "Pavement" pens you can draw any size/shape tile you like. Keep in mind that the normal Advanced Heroquest tiles are 5x5 and 10x5. For the sake of this exercise, create a 5x10 area in one pavement color, then create a single-tile thickness border around it in another pavement color. After you have created a basic tile to your liking, "export to JPG,PNG". Be sure to change the "Cell size in pixels" to 64, then create PNG, then save to your computer.

At this point you could stop, and still have a decent looking tile; but I prefer to tweak them a little bit using Gimp (see The Tools below) or Photoshop.

2) Open your new image in Gimp and configure the grid to 64 px ("Image > Configure Grid..."), then you'll want to Show grid and Snap to grid ("View > Show Grid", "View > Snap to Grid").

3) Use the Select tool and select the inner floor area, then create a new Layer (important!) and make sure it is selected. Then choose the Airbrush tool and create your shadows:

4) SIZING! You have several choices here (I'll cover 3). I wanted my tiles to be a little bigger (the room squares are just so small otherwise!), so they don't perfectly match up with the original tiles but I'll show you how to size them to fit exactly if you want.

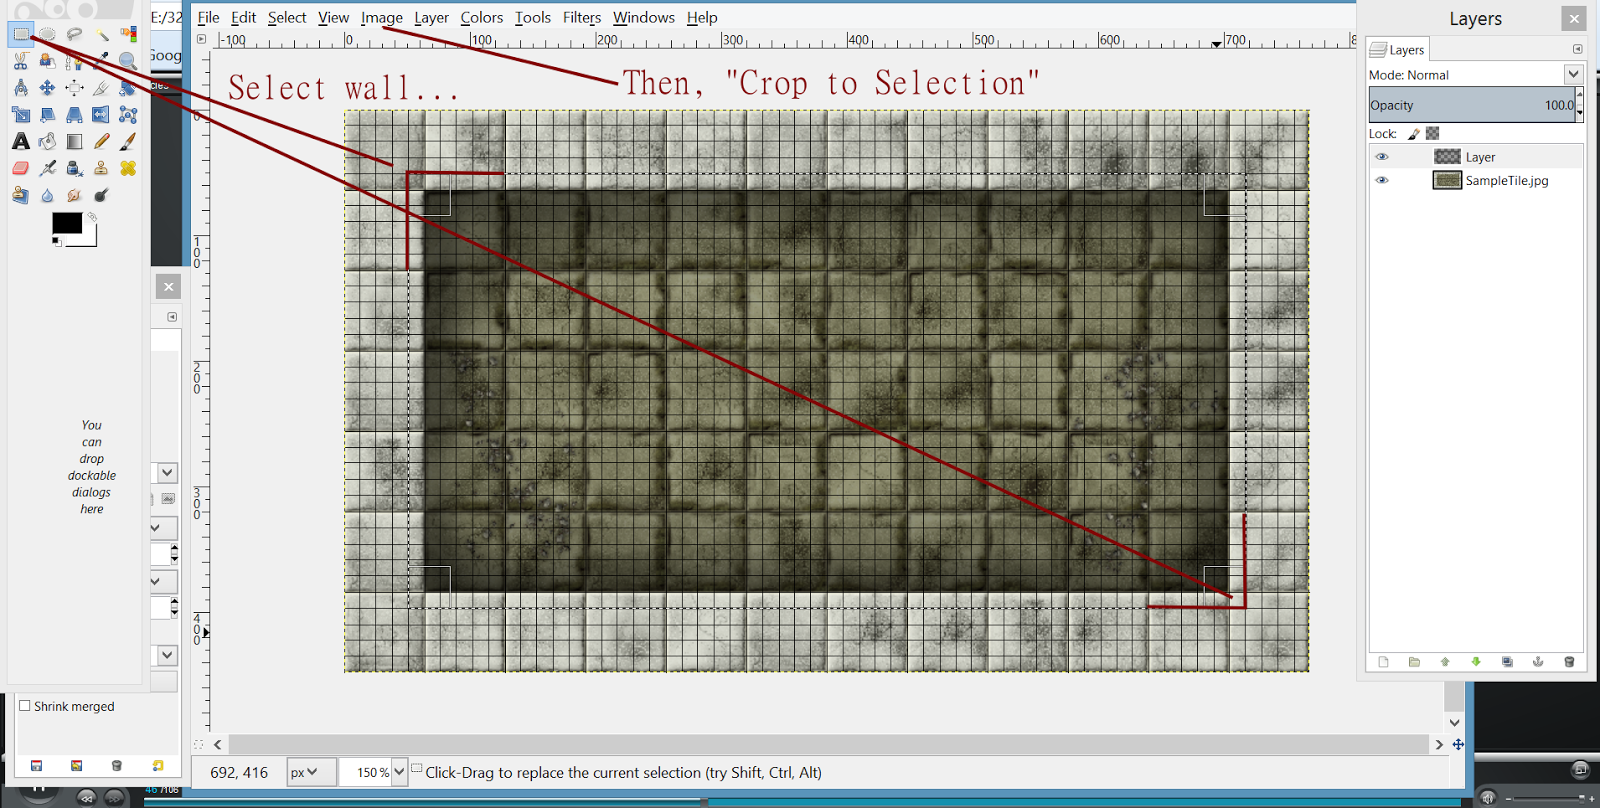
--- A) First we'll try just cutting off the outer wall - the result will fit perfectly with original game pieces. Use the select tool and select the inner floor again, then "Image > Crop to selection". Now check the canvas size and note it down (important for later!)... this one is [W: 640, H: 320]. You can export the image and be done, but if you want to keep the outer wall goto step B.

---B) Undo the "crop" (CTRL-Z) to get back your wall. Now change the grid size to 0.178 INCHES (not px), select the inner most grid-divide of the outer wall and "Crop to selection". This is how my tiles are sized; you can stop and export here but if you want them to match the original tiles (with those annoying small squares) continue to step C.

---C) Easy... working off step B), change the canvas size ("Image > "Canvas size") and enter the figures from step A) [W: 640, H: 320]... this will shrink your tile to fit exactly with the original game.

5) SAVE YOUR WORK!! ...save it as a Gimp project file so your Layers are retained. You'll need this when you go back to add your splash image to the floor.

The Tools (all free/open-source):
Pyromancers Dungeon Painter
Gimp
Inkscape

Coming Soon - Part 3 (adding your splash image to the floor)

Sunday, November 24, 2013

Collecting the OOP Skaven - a few more pieces...

Here are a few more Skaven, I need only 3 more to complete the collection. I could've had the rest but I forgot to bid on an ebay auction today hah... oh well.


Friday, November 22, 2013

New Dungeon Tile - The Phoenix Landing!

"Elves once lived in what is now the Kingdoms of Estalia, long before the men of Tylos came to settle on its warm coastal shore. Many ruins and relics of this distant past still remain to remind the humans of the elder race.

This Phoenix Landing is just one entrance to a hidden lair deep in the Irrana Mountains of Estalia."

The Wilderness part of this tile came from one of the great "Into the Wilderness" map-sets via DriveThruRPG. Most of these maps are less than $2, and truly worth buying in my opinion.

In the DOWNLOADS page of this blog you can download a printable version of this tile - enjoy!

Thursday, November 21, 2013

How to - Dungeon Tiles: Part 1 (Floor Images)

This first step goes over how I create the splash images for the floor of my Dungeon Tiles. Keep in mind, this is the floor of a dungeon (haha!) - so your image shouldn't be too complex or too colorful; it also needs to be flat (2-dimensional). You might get lucky and find an image that is already perfectly suitable, but chances are you'll need to doctor up the initial image a bit. There are plenty of ways to get this done - here is mine:

1) Find your image; I'll start with this one (used without permission):

2) Crop out the part you want and open the cropped image with Inkscape (see The Tools below).


3) Zoom in and then 'Select' your image. Then open the "Path > Trace Bitmap" window, update and hit OK.

4) Delete the original image from behind the new bitmap, the result should look like this:

5) Save the new bitmap image, "File > Export Bitmap"; be sure to increase the size to at least 300px and give the file a name.

Now you have a basic, 2-dimensional image to work from. Later you can add more color if you want but this is a good starting point.

I still need to go over making the basic tile, adding shadows to the tile, and finally adding your new splash image to the tile and fitting it to the floor. Most of this stuff you folks have probably already figured out and have even better methods but this is for those that don't. Stay tuned for more!

The Tools (all free/open-source):
Pyromancers Dungeon Painter
Gimp
Inkscape

Coming Soon - Part 2 (creating the basic tile)

Wednesday, November 20, 2013

Collecting the OOP Skaven - my latest find!

I grabbed these beauties on eBay... I now have most of the original Skaven from the Advanced Heroquest rulebook, though I still need a handful. What do you think?


Of course I'll have to strip all of them and re-paint but (eventually?) it will be worth it!

Monday, November 18, 2013

The first batch of Bad guys - Skaven!

Here are my first Skaven, ready for play. They took me several nights of work, which was admittedly longer than I had intended, but in the end it's still a quick and dirty paint job. My photography skills are quite poor clearly but here they are:


Tweaking the Crawler...

Another small change - this time to the Dungeon Generation tables.

We found ourselves playing "CorridorHammer" after a while as the players kept rolling 2 Sections and Nothing for features. They were fired-up to encounter some monsters and new rooms but kept rolling corridor after corridor. I made some changes on the fly (see below). The GM Reference sheet and the tables in the Enhanced Advanced Heroquest rules are already changed, you'll find them in the DOWNLOADS page.


Sunday, November 17, 2013

Dungeon Tiles RESIZED! - Please read!

If you've downloaded any of the Dungeon Tiles on this Blog, THEY'VE ALL BEEN RESIZED. On the DOWNLOADS page you can find the new re-sized tiles in PDF format.

Unfortunately, it wasn't until I went to have these printed on card that I realized they were off by 4 pixels! Worse yet, they were small by that amount. The original Advanced Heroquest tiles are already quite small and the round model-bases overlap as is. I wanted my tiles to be comparable but just hair (a millimeter or two) larger. If you are making your own tiles a good reference point is 64 pixels per square-tile.

I'm sorry if I caused anyone to waste ink printing the previous set of tiles. Keep in mind that these image (PNG) files are too big to print on your home printer. They need to be printed at original size at your local print shop.

The PDF versions however, are sliced into printable sized bites that should work for you at home.

Ok, well here is another tile then - this time sized correctly!