1) Ok this step is the easiest (funnest!) and will give you a simple, usable tile without any additional steps. The folks at Pyromancers have created an amazing tool (see The Tools below), it's practically cheating. Using the "Pavement" pens you can draw any size/shape tile you like. Keep in mind that the normal Advanced Heroquest tiles are 5x5 and 10x5. For the sake of this exercise, create a 5x10 area in one pavement color, then create a single-tile thickness border around it in another pavement color. After you have created a basic tile to your liking, "export to JPG,PNG". Be sure to change the "Cell size in pixels" to 64, then create PNG, then save to your computer.
At this point you could stop, and still have a decent looking tile; but I prefer to tweak them a little bit using Gimp (see The Tools below) or Photoshop.
2) Open your new image in Gimp and configure the grid to 64 px ("Image > Configure Grid..."), then you'll want to Show grid and Snap to grid ("View > Show Grid", "View > Snap to Grid").

3) Use the Select tool and select the inner floor area, then create a new Layer (important!) and make sure it is selected. Then choose the Airbrush tool and create your shadows:

4) SIZING! You have several choices here (I'll cover 3). I wanted my tiles to be a little bigger (the room squares are just so small otherwise!), so they don't perfectly match up with the original tiles but I'll show you how to size them to fit exactly if you want.
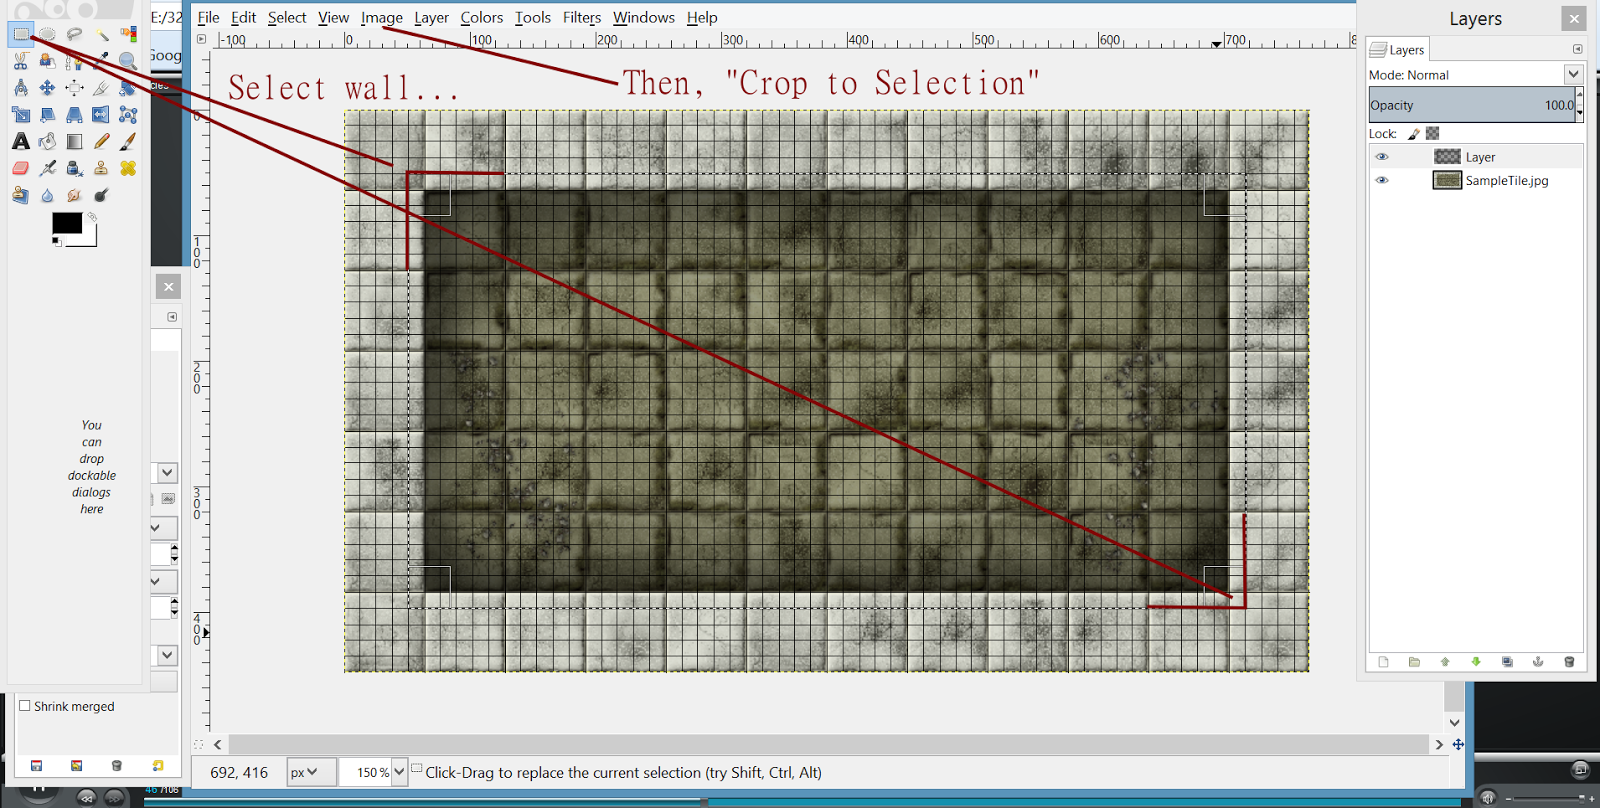
--- A) First we'll try just cutting off the outer wall - the result will fit perfectly with original game pieces. Use the select tool and select the inner floor again, then "Image > Crop to selection". Now check the canvas size and note it down (important for later!)... this one is [W: 640, H: 320]. You can export the image and be done, but if you want to keep the outer wall goto step B.

---B) Undo the "crop" (CTRL-Z) to get back your wall. Now change the grid size to 0.178 INCHES (not px), select the inner most grid-divide of the outer wall and "Crop to selection". This is how my tiles are sized; you can stop and export here but if you want them to match the original tiles (with those annoying small squares) continue to step C.
---C) Easy... working off step B), change the canvas size ("Image > "Canvas size") and enter the figures from step A) [W: 640, H: 320]... this will shrink your tile to fit exactly with the original game.

5) SAVE YOUR WORK!! ...save it as a Gimp project file so your Layers are retained. You'll need this when you go back to add your splash image to the floor.
The Tools (all free/open-source):
Pyromancers Dungeon Painter
Gimp
Inkscape
Coming Soon - Part 3 (adding your splash image to the floor)
No comments:
Post a Comment